Jasmine DeFoore is a photo consultant who knows first hand what busy editorial and commercial clients are looking for when it comes to finding photographers. She infuses her consulting projects with energy, enthusiasm and fresh ideas. Her approach integrates social media marketing with traditional promotional efforts and relationship building.
Jasmine launched her consulting business in 2010 and continues to be an active member of the photo community. Whether reviewing portfolios at international photo festivals, judging contests, blogging, lecturing at universities or mentoring young photographers, Jasmine keeps her love of photography at the forefront. You can find our more about Jasmine and her work by visiting her website and her blog.
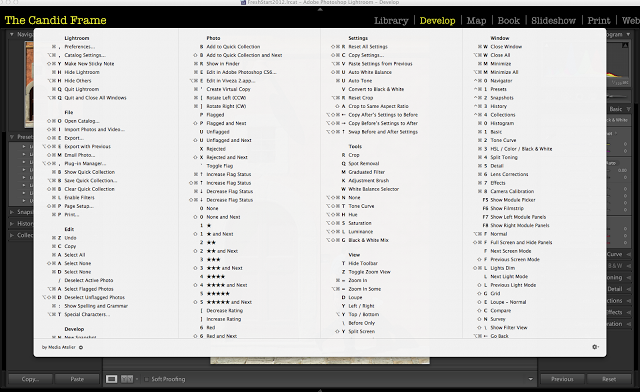
Short cuts can be an invaluable tool when using any application. It makes work efficient by saving you time from having to navigate the cursor to the menu bar. The challenge I have is just remembering those short cuts, especially when I am using a variety of applications.
Cheat Sheet for the Mac OS resolves this by providing a complete list of short cuts for virtually any open application. Simply press and hold the Command button and a "cheat sheet" appears on your screen detailing all the short cuts for that particularly app. Particularly helpful for when I'm using Adobe Lightroom or Photoshop, it also becomes a great tool for when I'm using my web browser or Mail.
The customization on this application is minimal. You can set it up to launch on start-up and change the duration that it remains up once you release the key, but that's about it. However, that is more than enough as it provides me a great way to remember a shortcut that's eluding me.
The application is free and is available through App Store.
Color accuracy is very important to digital photography and it revolves around our ability to get the white balance right. In this video, Ibarionex demonstrates how he considers white balance and how he uses Adobe Lightroom to achieve the best color accuracy.
Undoubtedly, there is a bit of satisfaction
on investing in a new bit of kit. The arrival of the FedEx van and the delivery
of the anticipated box on the doorstep feels just like Christmas, except of
course for the decorations, the excessive amount of food and a home invasion by
a bearded fat man, who might find himself facing serious labor issues revolving
around his use of elves and reindeer.
It's a wonderful feeling though, taking out the
exacto knife, cutting the tape and releasing a flow of Styrofoam packaging that
seems to linger around the house months after their initial arrival. Are we
sure those things aren't reproducing on contact with air, like some silent,
furless tribble?
Such moments create
the excitement over the potential of new creative opportunities. It
creates a wonderful swell of emotion, which we can experience repeatedly. At
least until, your bank account is overdrawn or the credit card has melted from
overuse. But before you get there, there might be other signs that may offer
fair warning before you end up at a freeway off-ramp with a sign reading,
"Will retouch images for food".
1. You have run out of space for all the original packaging
material.
The justification of course is to retain the
resale value, when something newer and shinier is calling you like the Greek sirens. But now they've displaced the clothes in the closet, which lay piled
in a heap on the lounge chair. Now, the only way to discern which clothes are
clean or not is the sniff test, which your significant other keeps insisting is
not that reliable.
2. Your spine has gone out of alignment because of the weight of
the camera bag.
That exhalation of air that you release each
time you pick up the bag may be an indication of weight being an issue. The
additional thirty pounds that I carry around my waistline is at least well
distributed, but the same might not be said for the bag or backpack that
carries equipment that you never end up using. What might have looked like a
cool walk in your twenties now looks like the initial signs of hip
displacement.
3. Your most passionate creative effort is measuring MTF curves
photographing brick walls.
Knowing that we got what we paid for is
important, especially when it comes to the sharpness and the resolution quality
of lenses. However, things may have been gone too far, when you are making
critical assessments such as whether the style of the brick wall is American or English Bond and if the gaps between bricks each measure 3/8 inches.
The fact you are using GPS data and Google maps to locate the
"perfect" wall is verging on the obsessive and is certainly making
your neighbors very nervous.
4. You become depressed and angry when the manufacturer releases a
new version.
It feels like a betrayal like in grade school
when little Debra Martinez gave Phillip Taylor the biggest cut of chocolate
cake and which you were sure Debra was going to give you because you let her
cheat off your test after she promised you were going to be her new best friend
and you believed her because she was so pretty and you already liked her and...
Well, it was wrong then and it's wrong now. Damn her.
5. You own camera bags that never carry camera
equipment.
They are there in the closet, in the garage,
piled in a heap beneath the desk, camera bags that held the promise of
perfection: the ideal shape, support strap, compartment size. They seemed
ideal, the best and final solution, a bag to rule them all. Now, they are empty
as their promise. It doesn't work now, because...there's this new lens
"I hate cameras. They interfere, they’re always in the way. I wish: if I could just work with my eyes alone. To get a satisfactory print, one that contains all that you intended, is very often more difficult and dangerous than the sitting itself. When I’m photographing, I immediately know when I’ve got the image I really want. But to get the image out of the camera and into the open, is another matter."Richard Avedon (found on PhotoQuotes.com)
In each episode I utilized images submitted by members of the Chasing the Light Flickr pool to illustrate those points as well as provide an opportunity to critique the effectiveness of each image. All 10 episodes are available at the Peachpit website.
If you are in the United States, you can download the episodes via iTunes. Otherwise, look for episodes in the iTunes store in your respective country.
I plan to feature similar videos in the near future based on a series of mini-critiques of 3 images from photographers who contribute to The Candid Frame Flickr pool. So, if you want to be considered for this in the future, please sign up and join the growing community of photographers.
Let me know what you liked about these video and what you would like to see more of in the near future.
Tony Di Zinno is a photographer whose assignments have led him to six continents in over 58 countries. Easily at home on Hollywood's studio back lots and on the foothills of the Himalaya, this self proclaimed 'photo-sherpa' has made his bones on propaganda by producing iconic images for Nike, Adidas and The North Face among others. Now as a faculty member at the Art Center College of Design, near Los Angeles, CA (his alma mater, PHO 89), Tony teaches various hybrid classes multi-discipline in nature.
Tony was invited on the board of Mountain to Mountain, a non-profit foundation working on projects in Central Asia, (Pakistan and Afghanistan). Previously, he had worked with M2M curating for a traveling photo exhibit called the 'Views of the Himalaya' benefiting a village in Nepal. The focus is on the education of young journalists in Kabul (video, radio and photo) with an emphasis on young women in the roles previously prohibited by Taliban extremists. He will soon be returning to that country as part of his work with M2M. You can discover more about Tony and his work by visiting his website.
In a perfectly clean, digital world it is easy to romanticize the film look and the results we achieved after spending hours in a chemical darkroom in the past. The funny thing is, back then we were usually trying to make perfectly clean, neutral, realistic images and we often cursed the affects the analog process imposed on us. When digital came along, I for one couldn’t wait to leave behind problems with dust and scratches and the inconsistency of chemicals. The promise of never having to spot a print again was a Nirvana I couldn’t wait to inhabit.
Fast forward a decade or more and the popularity of Instagram and the Impossible Project and their like demonstrate a thirst for an analog feel in a digital age. Admittedly, a lot of ‘digital sucks’ hipsters never knew a time when there wasn’t a choice between analog and digital and, like most new converts, they have been born-again as puritanical zealots. But I digress; for the rest of us who want the flavor of analog processes without the toxic chemicals there are many options at many price points. From the cheap (though not cheap for Facebook) Instagram at one end to plugins like Aliens Skin’s Exposure 4 at the other. But we’ll get back to price in minute; for now let's look at what Exposure 4 can do for you.
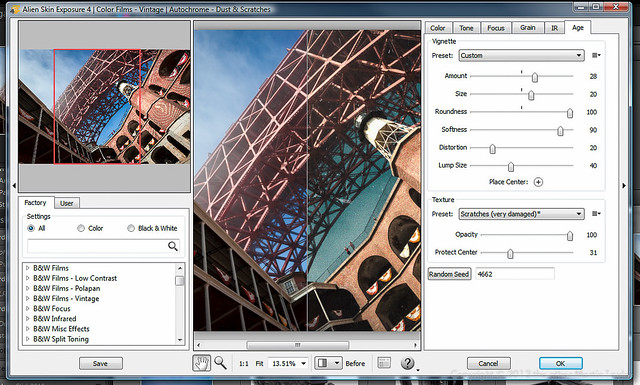
Alien Skin's Exposure 4 UI
Instagram on steroids?
It sort of is but in another way this comparison belittles Exposure 4. It’s nearly as easy to use as Instagram. For the purposes of this review I was using it mainly within Lightroom but I also tried it from Elements and Photoshop too and it felt properly integrated into them all. From Lightroom ‘Edit in Exposure 4’ launches the Exposure plugin and it fires up pretty quickly. Even without reading and documentation you will be up and running in no time. A preview image takes up the center of the window showing the effect of your filter in real time. You choose your preset or saved custom preset from the list in the bottom left quarter. The top left quarter preview image shows the effect of a preset just as you roll over it, even without clicking. It also shows the whole image with a indicator frame showing what area of the image you’re looking at in the main preview window. This is useful when you have zoomed into your main image (using the scroll wheel achieves this) and got lost within your image.
Color Presets in Exposure 4
B&W Presets in Exposure 4
There are hundreds of presets to choose from creating effects that date back from the dawn of photography through to the latest film stocks and trendy cross-processing. You can filter the effects by monochromatic and color of you can search if you remember any part of the name of the effect you are looking for.
Civil War Fort Point Powder Room processed in Exposure 4
Once you have applied a preset you can use the tabbed controls on the right side of the window to customize the result. This is useful if, like me, you found the presets a little heavy-handed and you wanted to dial back the effect. Before applying an effect I did try to get the exposure as accurate and as neutral as I could in Lightroom. Even so, after applying an effect, I did often find some range of tones would be looking much darker than I wanted. This is why I found the levels curve adjustment within the tool so useful. I’m sure I could have tweaked the effect after the fact when I was back in Lightroom but it was so easy to correct in Exposure I found myself using the levels on nearly every image I applied a preset to.
Although the presets may be a bit unsubtle out of the box that’s not to say that the effects you can achieve are not professional. When you tweak a preset and you like the results you can save your own presets for future use. The film grain effects, borders and various alternative technique overlays are amazingly convincing. The effects you can achieve are pretty inspiring and you can find yourself wasting hours on one image messing around with presets and tweaking them as you see fit. On the other hand, if you have a clear idea of what you want to achieve you can very quickly find a suitable preset to achieve it, tweak it to perfection and be done with the image in soft order. A nice feature is that, in Lightroom, you can work on several images at once. This means that, if you find the look you want and apply it to one image you can apply a consistent look to other images you think will benefit from the same look.
Conclusion
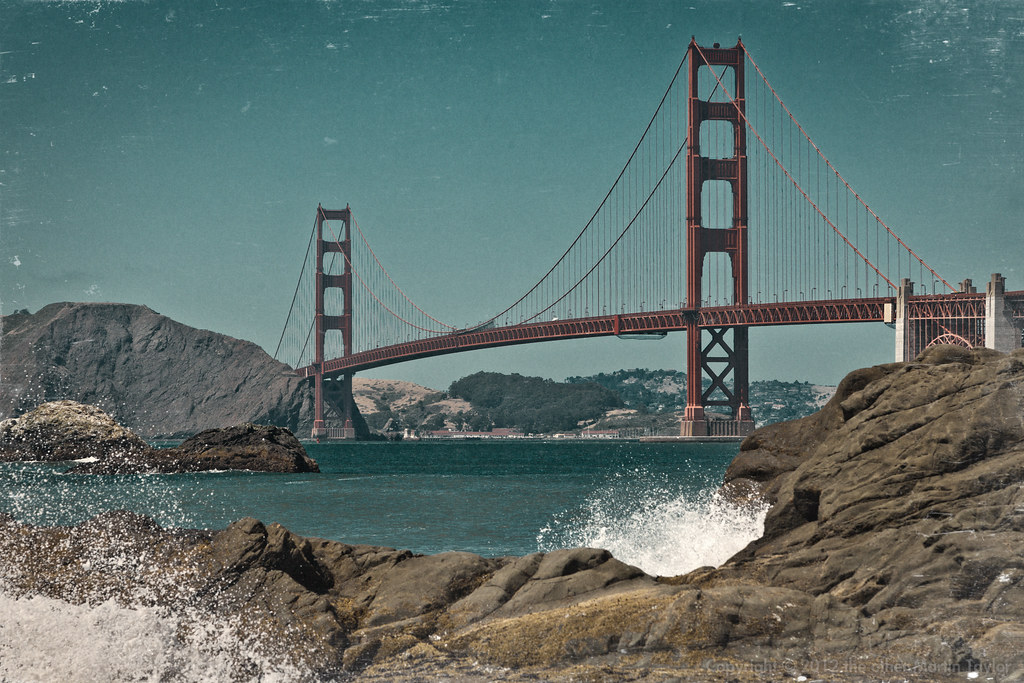
Golden Gate Bridge processed in Exposure 4
As someone who loves ‘straight photography’ I’m conflicted by the use of push-button effects to add funk to pictures. I love the ease of use and flexibility of Exposure 4. I like how it integrates into Lightroom, Elements and Photoshop equally well. Some of the effects you can achieve are amazing and look very authentic to my eye. It is so easy to use I do feel a little guilty showing the resulting images: am I being a fraud showing an effect I haven’t earned? Would I feel less guilty if it had taken me an hour to achieve the same effect following some long-winded Photoshop tutorial?
Truth be told, this product is probably not aimed at me. I am not rich enough or trendy enough to be their target audience. I do see Exposure 4 being incredibly useful for photographers who need a grungy, retro-look with a fast turn around. Senior and wedding photographers may find it pays for itself very quickly if you have a certain kind of client. For those kind of photographers the relatively high price might be an advantage because it will keep the riff-raff out. Uncle Jim is unlikely to buy Exposure 4 if he’s currently using Elements to process his images. This means that even the out-of-the-box preset looks will not be seen that commonly on Flickr. This exclusivity maybe what you need if you’re selling an expensive post-processed look as part of your package. Certainly this grungy look is very fashionable at the moment. Exposure 4 is one of the simplest, most customizable ways to achieve many of these looks resulting in very professional looking images. If you need this high-concept look, Alien Skin’s Exposure 4 may be just what you’re looking for.
You've asked me in evaluating your work to be brutally honest. Admittedly, it's something that other photographers have asked for, but I've always been reticent about honestly fulfilling such a request. I have often perceived it as the equivalent of a wife or girlfriend asking, "Do I look fat in this?" A frank, honest answer to that question is likely not going to end well.
However, you have been insistent about receiving such concise, unrestrained and to-the-point-feedback. So, I feel inspired to share with you why your pictures suck.
1. You're Lazy
Admittedly, you talk a good game. You talk much and well about your passion for photography, deftly demonstrating both your technical knowledge and proudly showing off your latest bit of kit. You know a good amount of photographic history and you are very insightful with your comments about the craft.
But Charlie, when was the last time you actually went out and made a significant body of work for yourself? I'm not talking about that job you did for pay, or the workshop you attended or that photo walk where you spotted that cute brunette with the Leica M9. No, when did you last go out and commit to producing images that truly challenged you; images that the mere thought of creating them got you excited about getting up in the morning?
I can tell it's been a long time, because you seem to have put more effort into uploading images to Instagram, Facebook and Google Plus, obsessively returning to those posts to check to see how many people provided you a virtual pat on the head. "Great capture". Really?
2. You're Preoccupied with Gear
I get it. There's obviously something primal in both us when it comes to new kit. I have shared that same rush of endorphins on taking a deep whiff of styrofoam peanuts when opening a freshly delivered FedEx package.
But honestly, how often have you used it since you got it? Yes, the unpacking video you posted on YouTube was wonderful. (My wife, by the way, likes the new haircut). But besides that first weekend burst of temporary inspiration, what you have done with it? What have you created that you truly are proud of? And no, fondling it and firing dry frames doesn't count. It seems like you've spent more hours reading blog posts, forums and watching videos about the gear than actually shooting with it. And what's this thing with you reading reviews after you already made the purchase? Aren't your images enough to discern whether you made the right choice or not?
3. You're Sloppy
It seems like you think that "good technique" is a filter in Photoshop. And if you defined a good photographer by how fast they can fill a 32GB CF card, you might be in the running to be one of the greats, but it's hard to see anything in your final result that warrants even the battery being charged.
You seem to be completely absent when you press that shutter release, taking no ownership of what you include in the frame. Yes, the bokeh is scrumptious and creamy, but this is supposed to be a photograph not bloody creme brulee.
Whatever happened to good composition? Good light? Good taste?
And no, I don't care that there is virtually no noise at ISO 128,000, the images are still devoid of anything that would even qualify it as a snapshot.
4. Photoshopping is not Photographing
Yes, Photoshop is an important and invaluable tool. We couldn't do much of what we do without it, or its equivalent. But how long do you actually have to sit at the computer, weaving that Wacom stylus like an orchestra leader, before you admit that most of that energy is being expended on putting lipstick on a pig?
Yes, those plug-ins and actions are awesome and that compositing technique you learned from Matt Koslowski is pure genius, but I'm sorry to tell you that there is no there, there. I could wash, wax and detail that AMC Hornet I drove in college as dutifully and passionately as humanly possible, but in the end, it would still be an AMC Hornet. Those are the facts.
What ever happened to your passion for making a single good, exemplary photograph in the camera? When did everything become fodder for over-saturation, over-sharpening, over-everything?
5. You Refuse to Edit Your Own Work
Though you are asking for my feedback, you must not think much of me. If you did, why else would you inundate me a batch of good, bad and near-misses? When did it become my job to figure out what you are trying to do as a photographer?
What am I supposed t make of this mish-mash of portraits, landscapes, close-ups, abstracts and those picture of your cat (which, okay I'll admit is just adorable)? I have a hard enough time trying to edit and assess my own work, much less yours. I just needed to see 10-12 images I wasn't expecting the entire photographic catalog of the International Center of Photography. If I wanted this kind of punishment, I could just put on a pair of headphones and listen to Debbie Boone singing 'You Light Up My Life" on a continuous loop for 24 hours.
If you can't sit down and decide which of your photographs captures who you are and aspire to be as a photographer, how do you expect me to? I am challenged in just finding a pair of matching socks in the morning.
I could say more, but I think I should show a little restraint.
I know you love photography as much as I do. You couldn't spend as much time and effort, subject yourself to the occasional ego-bruising, if you weren't as in love as you obviously are with making photographs. But the reality is that becoming a good photographer, hell becoming a good anything, involves commitment, diligence and the willingness to regularly fall on one's face. You obviously have some of that in you, because you are still around making images, when everyone else has taken up golf or knitting.
I hope that what I shared is helpful to you, but if it wasn't, I completely understand.
As part of our expansion of the content we are providing on The Candid Frame, we introduce the first video tutorial in which we focus on how a Levels adjustment in Adobe Lightroom helps improve the look and feel of your image. A Levels adjustment can dramatically improve contrast, particularly one photographed in open shade or on an overcast day. It should often be the first step to take when working on an image in your favorite photo editing application.
Please subscribe to the channel and look forward to more content from The Candid Frame.
This week marks the release of my latest book:Canon 5D Mark III: From Snapshots to Great Shots. Producing the book involved me delving into the inner workings of a camera in a way that I haven't had to do in the past. Or more accurately, I would do it at a more leisurely pace.
One of the benefits of that was not that I discovered some hidden secrets of the camera, but that I learned how to utilize the camera to fit my particularly needs as a photographer. I know that's an old photographic mantra, "Photographer! Know thy camera!", but that's quite a challenge when you have manuals so thick, you'd think Tolstoy had penned it. So, writing this book provided me the opportunity to get to know the camera well enough that I feel it's part of my process rather than something that can interfere with it. So with that in mind here are 7 tips that might prove helpful to those of you who have the 5D Mark III or even some of you that don't.
Tip 1: Access Main Controls via the Quick Control button.
Though the 5D Mark III offers independent controls for ISO, Autofocus, white balance, metering and exposure compensation, I have found that hitting the Quick Control button on the camera, located to the right of the LCD screen provides a better option. When pressed, I gain access to all those features which I can quickly navigate to using the Multi-controller. This makes it quite easy to change those controls that I frequently adjust such as white balance, ISO and exposure compensation. An added plus is that because the screen is illuminated, I can more easily make adjustments under low light far more easily.
Tip 2: Disable the Image Review
I know that "chimping" or reviewing each image as it's shot is very tempting, but I have found it to be a big distraction. Instead of focusing on what's happening and changing in front of my lens, I have my head buried in my screen, trying to feel pleased with myself. While the screen can provide some important information with regards to exposure and white balance, after the initial image, I need to focus more on the process of shooting. With street photography things are constantly changing and I can easily miss a moment if I constantly keep looking down at my screen.
Tip 3: Enable Highlight Alert
Exposing for the highlights is another one of those photographic mantra's that's worth repeating. With digital, you want to make sure that you don't overexpose your image, because if the highlights's are blown out that means that there is no image data, no pixels there to recover or work with. Though shooting raw does provide you a little latitude there, nailing the exposure in-camera has been a normal part of any photographer's process. That's why I enable the 5D Mark III's Highlight Alert to create a warning that the image is at risk of overexposure. If the image is, during playback you will see that area of the image wink in and out, between black and white. Often referred to the techies among us as the "blinkies", it's a clear indication that the exposure has to be adjusted.
Tip 4: Consider UDMA Compact Flash Cards for best performance
Though the 5D Mark III accommodates both a CompactFlash and an SD memory card, my unscientific evaluation of the camera seems to reveal that I get the best write speed performance with CF cards, particularly UDMA rated cards. Now, this likely only makes a big difference when I am shooting action or sports, where I the camera is shooting at continuously at its highest burst rate. If I am shooting portraits or still life, I am shooting at a more leisurely pace. If I am using both types of cards, I will often designated the CF card for raw files and the SD for jpegs.
Tip 5: Enable the Viewfinder Grid Display
There was a time when if you wanted a grid display in your camera, you would have to physically replace the focusing screen. Now, it's a menu option. How cool is that? I enable this feature to help me to keep my horizon lines straight when making my compositions. For some reason, my eyes and brain are refusing to cooperate and allow me to do this just by eyeballing it. I seem to be seeing everything off-kilter...and I'm not even a drinker. In any case, enabling this feature provides me the reference lines I need to make the slight adjustments needed, so I don't have to rotate and crop into my image later in Lightroom.
Tip 6: Register Your Battery
The 5D Mark III provides the ability to register individual batteries not only to assess the remaining charge, but also to provide a shutter count and measure recharge performance. This can be invaluable information for those of us that do a lot of shooting. I own two batteries, which provides me ample power for an aggressive day of shooting and having this additional data on the performance of each battery provides me a level of security that I'll have a viable and fully charged battery when I need it most.
Tip 7: Input Copyright Information
As photographer, we own the copyright to an image, the moment we depress the button and make the photograph. Though protecting your rights includes registering your copyright with the Copyright Office, including your contact information is still an important part of protecting your rights to your images. As part of this, I choose to enable the 5D Mark III's feature to include my copyright information, specifically my name with each image. Though, I can do and more when importing my image in Lightroom, it's a good idea to know that the data is embedded at the moment of creation.